How to Build a Concrete Base for Your Garden Sauna

A sauna base needs to handle 800-1,200kg load, stay level for 20+ years, and drain properly. Here's exactly how I built mine for £265 over 5 days - photos included.
Quick Summary: Remove turf, dig out soil, lay 50mm Type 1 hardcore (compacted), DPM membrane, rebar, then pour 100mm concrete slab. Hand-mixing is cheaper and more controllable than ready-mix. Leave to cure for a few weeks. Total cost: £200-300 for a 2.4m x 2.1m base, plus skip hire for soil removal.
Before You Start: Calculate your finished floor level first. Work backwards from where you want the sauna floor to sit - ideally aligned with any external patio so it all flows nicely. Getting this wrong is expensive to fix later.
Why Concrete? (Alternative Options)
| Option | Cost | Pros | Cons |
|---|---|---|---|
| Concrete Slab | £200-300 | Permanent, level, solid | Hard work, permanent |
| Paving Slabs | £150-250 | Easier, removable | Can shift, joints |
| Deck Platform | £300-500 | Raised, drainage | More expensive, needs treating |
| Gravel | £80-120 | Cheap, drains well | Not level enough, shifts |
I chose concrete because: Once done, it's done. Level stays level. No maintenance. Proper job.
What You'll Need
Materials (for 2.4m x 2.1m base = 5m²)
| Item | Quantity | Cost |
|---|---|---|
| MOT Type 1 hardcore | 0.5 tonne | £35 |
| Ballast (sand/gravel mix) | 1 tonne | £65 |
| Cement (25kg bags) | 10 bags | £50 |
| Rebar (steel reinforcement) | ~20m | £40 |
| DPM (plastic damp proof membrane) | 6m² | £18 |
| Formwork timber (18x100mm) | 10m | £25 |
| Stakes for formwork | 8 pieces | £12 |
| Screws, pegs, misc | - | £20 |
| Total Materials | £265 | |
Additional Costs to Budget For
| Item | Notes | Cost |
|---|---|---|
| Skip hire (4-yard) | For soil removal - I filled half of it | £200-280 |
| Whacker plate hire | 1 day - for compacting Type 1 | £40 |
| Cement mixer hire | 2 days - essential for hand-mixing | £70 |
| Labourer (optional but recommended) | Digging and barrowing is brutal work | £100/day |
Hiring help: I paid a labourer £100/day for the heavy digging. At my age, this felt like excellent value. The digging, barrowing soil to the skip, and mixing concrete is genuinely hard physical work - don't underestimate it.
Tools Required
- Essential: Spade, wheelbarrow, spirit level (1.2m+), rake, trowel, bucket
- Helpful: Whacker plate (hire £40/day), laser level (£30), concrete mixer (hire £35/day)
- Safety: Gloves, boots, knee pads
The Build Process
Step 1: Mark Out & Excavate (1-2 days)
Check for services first:
If your sauna is near the house, check for underground cables and pipes before digging. Call utility companies for plans, or hire a CAT scanner. My sauna was at the back of the garden, well away from the house, so I was confident there was nothing there - but I still dug carefully.
Mark your area:
- Measure your sauna dimensions (e.g., 2.4m x 2.1m)
- Add 100mm all around (base = 2.6m x 2.3m)
- Use string lines and corner pegs to mark rectangle
- Check diagonals are equal (confirms square)
Calculate your finished level:
This is crucial. Work backwards from where you want the sauna floor to end up. If you're matching an existing patio level, measure down from there. My sauna floor is tiled to match the external patio, so everything flows together nicely.
Remove the turf:
- Cut turf into strips with a spade
- Roll up and set aside (can relay elsewhere in garden)
- Or just dig it in with the soil
Dig out the soil:
- Excavation depth: 150-200mm below finished slab level
- You'll hit roots - dig them out properly, don't leave them under the slab
- Keep the base roughly level as you go
- Barrow soil to skip (this is the hard work)
Soil removal is brutal: I filled half a 4-yard skip with soil. Couldn't get a mini dumper round the side of the house, so every load went by wheelbarrow. This is where a labourer earns their money. Budget £200-280 for skip hire.
Ground conditions matter:
- Sandy soil (what I had): Drains well but needs good compacted sub-base
- Clay soil: Holds water - may need extra drainage
- Rocky: Hard to dig but stable foundation
My experience: The sauna was at the back of the garden on grass. Ground was sandy with lots of roots to dig out. Took about 2 days with a labourer helping. We did it in autumn when the ground was soft - much easier than summer-baked earth.
Step 2: Type 1 Sub-Base (Half day)
Order MOT Type 1:
- Standard sub-base material (crusite limestone/granite)
- About 0.3-0.5 tonne for 5m² area at 50mm depth
- Delivered in bulk bag (£35) or loose
Laying the sub-base:
- Tip Type 1 into excavated area
- Spread evenly with rake - 50mm depth is sufficient
- Compact thoroughly with whacker plate (hire from HSS/Jewson, £40/day)
- Check level - should be flat and solid
- Add more in low spots, compact again
Compaction test: Walk on it. Should feel rock-solid with no give whatsoever. If it moves at all, compact more.
Honest assessment: With sandy ground like mine and a hefty reinforced concrete slab going on top, the Type 1 layer was probably overkill. On clay soil or with a thinner slab, it's more important. I did it anyway - belt and braces approach - but you could argue it's not essential if your soil is stable and your slab is properly reinforced.
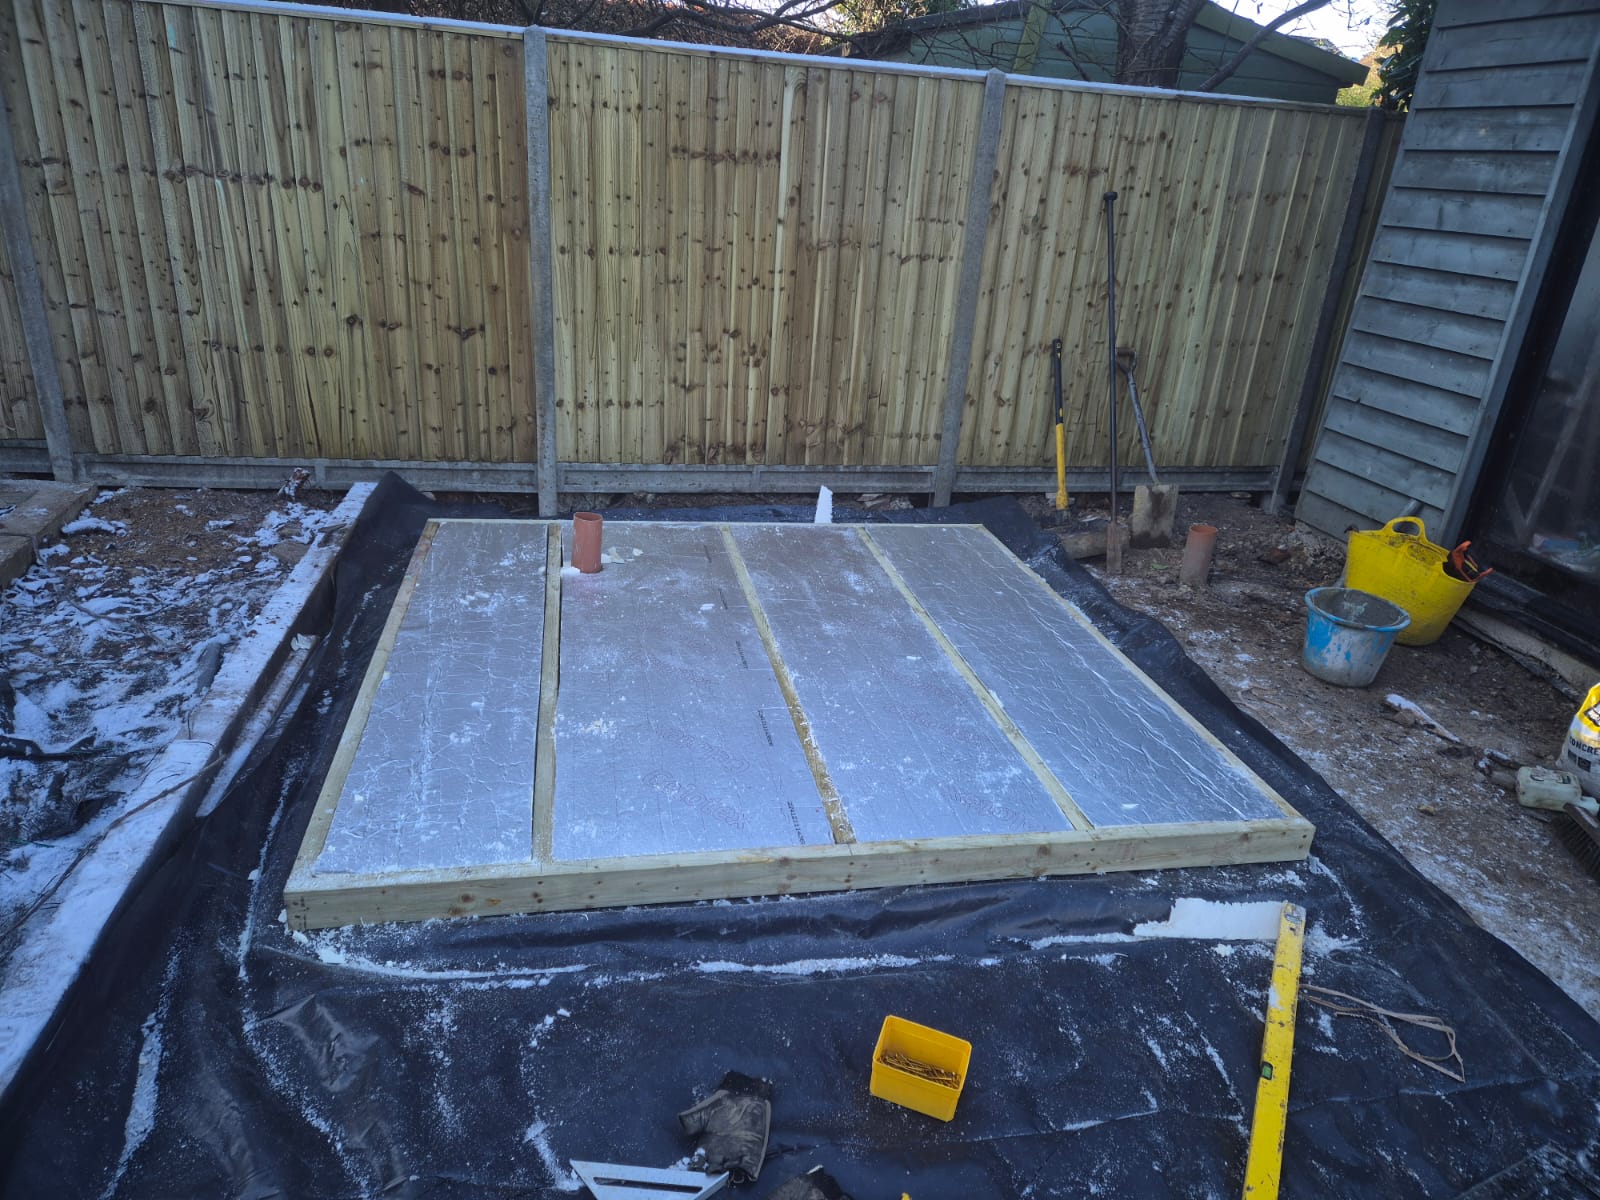
Step 3: DPM & Formwork (1 hour)
Lay damp-proof membrane:
- Roll 1200g DPM (heavy duty) over hardcore
- Overlap sheets by 300mm minimum
- Run up sides 100mm
- No need to seal overlaps (concrete weight holds)
Don't skip DPM! Concrete is porous. Without DPM, ground moisture will wick up into your sauna base = rot. £18 membrane protects £4,000 sauna.
Build formwork:
- Cut 18x100mm boards to perimeter lengths
- Set boards on edge around perimeter (tops level)
- Drive stakes outside boards every 600mm
- Screw stakes to boards
- Check tops are level (use laser or long spirit level)
- Backfill outside stakes with soil (holds firm)
Getting level correct:
- Use laser level (£30 from Screwfix) - easiest method
- Or: long spirit level on straight timber across formwork
- Formwork tops = final concrete surface level
- Aim for within 3mm across entire base
Step 4: Concrete Pour (1 day)
Option A: Hand-Mix (What I Did - Recommended)
- Cost: £115 (ballast + cement)
- Pros: Cheaper, work at your own pace, more controllable, no time pressure
- Cons: Hard physical work, need to hire cement mixer
- Mix: Standard ratio - ballast (combined sand/gravel), cement, water
Option B: Ready-Mix Delivery
- Cost: £140+ (minimum load usually 1m³)
- Pros: Fast, consistent mix, less physical work
- Cons: Need truck access, time pressure (sets in 90 mins), can get very messy if things go wrong
- Order: C20 concrete, 50mm slump
Why I chose hand-mixing: Ready-mix can get really messy if you're not set up for it. With hand-mixing, you control the pace - mix a batch, pour it, spread it, repeat. No stress about the concrete going off before you're ready. Hire a cement mixer (£35/day) - don't try to mix by hand in a wheelbarrow, you'll regret it.
Pouring process:
- Lay rebar on the DPM (use 50mm spacers or bricks to lift it off the membrane - you want the steel in the middle of the slab, not at the bottom)
- Mix concrete in batches - not too wet, should hold its shape
- Pour into formwork, starting at far corner
- Spread evenly with rake (aim for just above formwork level)
- Tamp down with timber beam to remove air pockets
- Strike off level with formwork using a straight timber bar - drag it across the top of the formwork to screed off excess
- Smooth surface with steel trowel or float
Finishing:
- Don't over-trowel - a rough surface is absolutely fine (timber sits on it, or it gets tiled)
- Use spirit level constantly as you work
- Edges should be flush with formwork tops
- I got a decent finish, but since my floor was getting tiled anyway, it didn't need to be perfect
Weather: Do this when it's not raining. We did it in autumn - ground was soft, air was cool, perfect conditions. Avoid pouring in heavy rain or extreme heat.
Step 5: Curing (2-4 weeks)
First 24-48 hours:
- Cover with plastic sheet (prevents rapid drying/cracking)
- Weight down edges so wind doesn't blow it off
- Don't walk on it
Days 2-7:
- Remove plastic after 48 hours
- Spray with water 2x daily if hot weather (keeps surface damp)
- Can walk on carefully after 48 hours
- Remove formwork after 48 hours - unscrew stakes, lever boards away gently
Full cure: 28 days
Concrete continues hardening for weeks. At 7 days it's about 70% strength. At 28 days it's 100%.
My approach: I left it for a few weeks before building. No rush - it was autumn, and I wanted it properly cured. The sauna isn't going anywhere, so there's no benefit to rushing onto a green slab.
Anchoring the Sauna Frame
Once cured, you'll anchor your timber base frame to the concrete.
Options:
- Concrete anchor bolts: Drill into slab, insert expanding anchors, bolt frame down
- Frame brackets: Metal brackets fixed to concrete with masonry screws
- Just sit it there: Honestly, a finished sauna weighs 800kg+. It's not going anywhere.
Honest opinion: I used anchor bolts to fix the frame to the slab. With hindsight, this felt a little pointless - the finished sauna is so heavy it's not going anywhere. I did it for peace of mind and because it felt like the "proper" thing to do, but it's probably not strictly necessary.
Floor Finish Options
Your concrete slab is just the base - you'll need a finished floor surface inside the sauna.
Option 1: Tiles (What I Did)
I tiled the sauna floor using the same tiles as the external patio, so it all flows together visually. This works brilliantly - looks intentional and high-end.
- Pros: Waterproof, easy to clean, can match existing patio
- Cons: Cold underfoot (use wooden floor grates), need to tile properly
- Tile type: Porcelain or natural stone - must be suitable for wet areas and temperature swings
Option 2: Wooden Duck Boards
Slatted wooden panels that sit on the concrete. Common in traditional saunas.
- Pros: Warm underfoot, traditional look, removable for cleaning
- Cons: Need regular maintenance, can rot if not dried properly
Option 3: Sealed Concrete
Just seal the concrete with waterproof paint/sealer.
- Pros: Cheapest, simple
- Cons: Cold, industrial look, surface can degrade over time
Pro Tip: Granite Skirting Upstand
This is something I did that I've never seen mentioned in other guides, and it works brilliantly.
Around the base of the interior walls, I installed 100x100mm granite tiles (20mm thick) as a skirting upstand. These sit on top of the floor tiles and protect the bottom of the wooden wall cladding from water splash and damp.
Why it matters: The bottom edge of interior panelling is most vulnerable to moisture damage. Water pools on floors, splashes during löyly, and humidity is highest at floor level. The granite upstand acts as a permanent barrier - water can't wick up into the wood.
Cost: About £50-80 for enough granite tiles. Cheap insurance for protecting expensive thermo-treated interior panelling.
Drainage Considerations
Concrete slab needs to handle water runoff from sauna and surrounding area.
Option 1: Slight Fall (What I Did)
- Set formwork with 1:80 fall away from house
- 12mm drop across 2.4m length
- Water runs off edges into surrounding gravel/soil
- Simple, effective, no drainage pipe needed
Option 2: Perimeter Drainage
- Dig shallow channel around base perimeter
- Fill with gravel or land drain pipe
- Channels water away from base
- Good if base is in dip/low area
Option 3: Perfectly Level
- If sauna has its own drainage (unlikely for barrel/basic units)
- Just ensure surrounding ground drains away from base
Common Mistakes to Avoid
1. Skipping Hardcore
Problem: Concrete poured straight onto soil will crack and sink.
Solution: Always use 100mm compacted hardcore first.
2. Poor Compaction
Problem: Soft hardcore = sinking concrete = unlevel sauna.
Solution: Hire proper whacker plate, compact thoroughly, test by walking on it.
3. No DPM
Problem: Moisture wicks through concrete into timber base = rot within 5 years.
Solution: Always use 1200g DPM under slab. £18 insurance policy.
4. Insufficient Concrete Thickness
Problem: 50-75mm slab will crack under sauna weight.
Solution: Minimum 100mm thick. 120mm if heavy materials.
5. Poor Leveling
Problem: Wonky base = wonky sauna = doors don't close properly.
Solution: Use laser level. Check level constantly. Aim for ±3mm max.
6. Rushing the Cure
Problem: Building on wet concrete = cracked slab.
Solution: Wait minimum 7 days. Check it's dry (not dark/damp looking).
Cost-Saving Tips
1. Order Concrete with Neighbours
Minimum delivery is 1m³ (you need 0.5m³). Share with neighbour doing patio/path. Saves delivery charge.
2. Reuse Formwork Timber
After curing, use same timber for sauna frame/base. Saves £25.
3. Skip Reinforcement Mesh
For small saunas on good ground, 100mm concrete without mesh is adequate. Saves £35. I used mesh anyway (belt & braces).
4. Collect Hardcore Yourself
Some recycling centres sell MOT Type 1 for £15/tonne (you collect). Saves £20 delivery.
5. Hand-Mix in Batches
If no truck access and happy to work over 2-3 evenings, hire mixer and do it yourself. Saves £40 vs ready-mix. Hard graft though.
FAQs
Do I need building regulations approval?
No. Sauna bases/foundations don't require Building Control approval. Just do a proper job.
How thick should the concrete be?
100mm minimum for garden saunas. 120mm if using heavy materials or poor ground.
Can I use paving slabs instead?
Yes, but harder to get perfectly level. Lay on 50mm sharp sand, use string lines, check constantly with level. Joints between slabs can cause issues.
What if my ground is clay/soft?
Increase hardcore to 150mm, compact extra-thoroughly. Consider geotextile membrane under hardcore.
Do I need reinforcement mesh?
Not essential for small saunas on good ground, but recommended. A142 mesh costs £35 and adds significant strength.
Can I pour in winter?
Avoid if below 5°C. Concrete won't cure properly. Wait for milder weather or use rapid-hardening concrete (£10 extra per m³).
How level does it need to be?
Within 3mm across entire base. Use laser level (£30). Critical for door fitting later.
What if I make it wonky?
For minor issues (<10mm), use packers/shims under sauna frame. For major issues (>20mm), you'll need to re-do it or build timber sleepers to level.
My Build: Timeline & Costs
The whole foundation took about 5 days of actual work, spread over several weeks (no rush on curing).
Day 1-2: Excavation
- Removed turf and dug out soil
- Hired a labourer (£100/day) - the digging is brutal
- Wheelbarrowed soil to skip (couldn't get a dumper round side of house)
- Dug out tree roots as we went
- Half-filled a 4-yard skip with soil
Day 3: Sub-base
- Type 1 delivered
- Spread 50mm layer
- Compacted with hired whacker plate
- Laid plastic DPM
- Built timber formwork
Day 4: Concrete
- Laid rebar on spacers
- Hand-mixed concrete in hired mixer (ballast + cement + water)
- Poured, spread, tamped, levelled
- Finished with spirit level and smooth bar
- Covered with plastic
Day 5+: Curing
- Removed formwork after 48 hours
- Left to cure for a few weeks - no rush
- Started building when fully cured and dry
Weather note: We did this in autumn. Ground was soft (easier to dig), weather was cool (concrete cures better), and dry enough not to worry about rain. Would have been much harder in summer with baked earth, or in winter with frost risk.
Total active work: ~5 days
Total cost: ~£265 materials + £200-280 skip + £100-200 labourer = £565-745
Is It Worth DIY?
Professional groundworker would charge:
- Labour: £500-800 (incl. their labourer)
- Materials: £265
- Skip: £250
- Total: £1,000-1,300+
DIY saves: £300-600
Even with hiring a labourer to help, DIY is significantly cheaper. And you know it's done properly because you did it yourself.
Bottom Line
A proper concrete base is THE foundation of a long-lasting sauna. Rush it or do it badly = problems for years.
Take your time, get it level, use proper materials. Two days of work now = zero issues for 20+ years.
My base is 18 months old. Still perfectly level, no cracks, no issues. Best £265 and 10 hours I spent on the entire build.
Ready to Build?
Get complete construction plans with detailed foundation specs at saunaplans.co